2013年3月29日星期五

Best Keyboard

If you are looking for the best keyboard on the market, this article is a must read. The best of the lot, have been reviewed here.

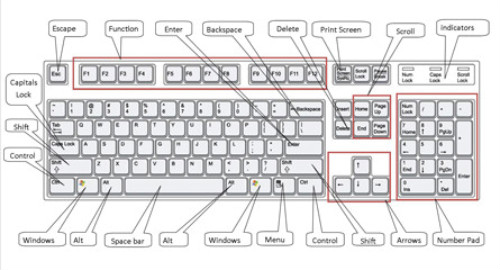
People who spend maximum amount of their work time, keying in data through a good keyboards, need to be very discerning when buying a new one. Your comfort while working is very important and that's why, you should go for the best keyboard on offer.

Though the structure of basic QWERTY keyboard remains the same, there are many innovations made in its design over the years. There are different types of keyboards. You can have wireless keyboards, specially designed ergonomic keyboards and even gaming keyboards. They come with a lot more extra function keys, making it easier for you to navigate through your computer programs entirely through the keyboard.

Reviews

What pianos are to accomplished players, computer keyboards are to people working in information technology sector. What matters when you buy a new keyboard is your feel of it. More than the features and everything else, what matters is how easily your fingers find their way across it. The ease of use should be your main consideration while choosing the best keyboard for your desktop computer. You may need a keyboard that is specially designed for gaming purpose or general home use. Whatever be your requirement, you will find what you want in the range of computer good keyboards presented below. 

Microsoft Natural Ergonomic Keyboard 4000
Widely acclaimed as the best ergonomic keyboard on offer, Microsoft Natural Ergonomic Keyboard 4000 is the perfect choice for home and office desktop computer users. Its ergonomic design is aimed at providing comfort while typing and many extra features add to its usability. For example, a separate zoom key is presented that can directly let you zoom in to the screen directly. An improved number pad, special Internet hot keys, multimedia keys are some of the other features to take note of. With a three year warranty, it will cost you only $59.95. 

Logitech G19
Priced at $149.99 after discounts, the Logitech G19 is voted as the best gaming keyboard. This good keyboards is for diehard gamers who need to use it as their gaming console. With an attached LCD panel for game information display, VoIP communication, images display and videos, 12 programmable keys for games, custom key back lighting option, two USB ports and game mode switching, you will never find a better gaming keyboard other than this one. This keyboard will give you the edge you need in winning games by providing speed and functionality. 

Microsoft Arc Keyboard
If you are looking for a budget wireless keyboard with basic functionality, Microsoft Arc keyboard is a great choice. Besides being very lightweight and compact in size, it comes with 2.4 GHz wireless transmission technology and a stowable transceiver. With all these features, it comes with a price tag of $59.95 only. 

HP Wireless Elite Keyboard
One of the low-budget wireless keyboard choices is HP Wireless Elite, with a price tag of only $32.09 after discount. This extremely stylish keyboard comes with 2.4 GHz wireless technology and can operate within a range of 32 feet. It has a long battery life and is designed to be energy efficient overall. 

Saitek Eclipse II
Another product is Saitek Eclipse II. With illuminated keys and special angle adjustment for ease of use, this keyboard will cost you only $51.22. 

Logitech diNovo Edge
One of the best bluetooth keyboards is Logitech diNovo Edge. A sleek minimalistic design with Perfectstroke silent key technology, this is one of the most stylish and silently operating good keyboards on the market. Two hour charging will keep the keyboard functional for two months straight because of its long life rechargeable battery. The price tag is high but certainly justified at $179.99.

Don't hesitate in spending more for a good ergonomic keyboard as it will add to your working comfort and ultimately reduce your stress in the long run.

Good Keyboards In Gaming

Veteran gamers would tell you the importance of precision and skill in winning, and a gaming good keyboards is crucial in achieving that. Some features that one expects from a gaming laptop are programmable keys, an ability to put the keyboard on gaming mode, and may be, an LCD screen. Keeping in mind these requirements, manufacturers have come up with innovative designs and features, but as in the gaming world, there is a lot of competition in this segment as well.

Top Gaming Keyboards

Microsoft SideWinder X6

The Microsoft SideWinder range has been the favorite of gamers all round the world, and the SideWinder X6 continues its legacy. The USP of the keyboard is its Cruise Control feature which makes it easy to repeat a particular action. This feature allows the user to perform other tasks in a game rather than holding a key down for long periods.For example, in racing games, wherein one always looks to accelerate, Cruise Control keeps the vehicle going automatically. Although, most popular games have an auto-run feature pre-installed, Cruise Control proves to be very beneficial on other games.Apart from the Cruise Control feature, another feature that sets this keyboard apart from its rivals is the flexibility of a removable number pad. In other things, the keyboard is equipped with backlighting and six dedicated programmable keys. At $75, this keyboard offers value for money to users. 

Logitech G110

Special attention has been given to provide users access to media while gaming as the keyboard boasts of media control keys and a large scrolling wheel for volume control. Most gamers complain of accidentally hitting the Windows key, which takes them back to the home screen when they are in the middle of the game. Also, you may have noticed that when you press more than one keys simultaneously, the keyboard doesn't register anything (ghosting), which can prove fatal in a game. Both these issues have been taken care of in Logitech G110. The USB 2.0 takes the gaming experience to a different level and with the red and blue options of backlighting, the keyboard seems too hard to resist. The device is priced at $70, which is fair considering the features that it has to offer.

Razer Lycosa

When a keyboard has already done itself a lot of good by winning the Top Ten Reviews Gold Award, there isn't much that we need to delve into. The keyboard comes packed with features that one expects from its class like the media control keys, Windows key disability, anti-ghosting and above all its amazing design. The backlighting is impressive, but what sets this good keyboards apart is its ability to allow the user to program every key present on the keyboard! A lot of other keyboards also allow key programming, but the number of keys you can program is limited. Razer has done remarkably well as far as the brand building is concerned, courtesy its gaming team which has won many competitions in the past. Razer Lycosa retails at $73.

SteelSeries 6Gv2

For those who are easily put off by lack of ergonomics, we would like to say that this keyboard deserves a second look. Although, this keyboard looks similar to ones you see around in offices, but it packs in all the features expected of a gaming keyboard. The inclusion of a USB to PS/2 adapter is a refreshing break from similarly designed keyboards. It weighs more than other keyboards, but rather than a drawback, the brand uses this to position itself uniquely in the market. The keyboard is priced at $100 which may be a bit on the higher side for some users.

Razer Tarantula

Another competent keyboard from Razer, which has manufactured few cutting edge computer peripherals. Tarantula from Razer is truly a master piece. It comes with 10 programmable macro keys, earphone-out, microphone-in jacks, plug and play without a driver, anti-ghosting capability, etc. The best feature what I liked about this product was its interchangeable keys. Yes, there are few gaming keys on this keyboard which can be interchanged as per individual's choice and also these specific keys can be assigned different commands. In the box, you get few extra keys and also a ring-like tool with which you can interchange the keys for that personalized gaming experience. It is amongst the best keyboard for gaming. Approx. price $99.

So these were few of the best gaming keyboards in the market. A few of these are priced high while a few others are not. Like I mentioned before, the generic computer keyboards may prove to be incompatible controllers for some of the advanced games of today. Hence, there is a need for exclusive good keyboards to optimize the gaming experience.


2013年3月4日星期一

How to Clean a Laptop Screen with Household Products

Do you miss that shiny new laptop look or can't stand the thought of the misguided executive image? Here's how to brew your own laptop screen cleaning kit using simple household ingredients. Please read ALL the warnings in the section farther down in this article before attempting to clean any LCD screen!
These days, most manufacturers are no longer recommending using products that contain ANY alcohol, ammonia, or other strong solvents on LCD screens.
If you take great care in the selection of the ingredients for your solution, the containers you are going to mix your solution in, and your choice of cleaning cloths, it is possible to clean your LCD screen with household products. If you are unsure about ANY of the pieces mentioned above, then your safest path is to purchase a package of single use wet/dry commercially available wipes that are designed, and tested, specifically for cleaning LCD and Plasma screens.
1.Create a gentle cleaning solution. The ideal solution is plain distilled water. If more heavy cleaning is needed a 50/50 mix of white vinegar and distilled water can also be effective.
2.Put the solution in a small atomizer bottle, the type that you push from the top to get a fine mist. Don't use this to spray on the screen itself, however.
3.Apply a minimal amount of the solution to very soft cloth such as a cotton cloth (e.g. an old T-shirt), a lint-free microfiber cloth, a disposable cloth (such as a soft, non-woven compress or disposable wipe from the drugstore with no cleaning agents added) or similar. A large cloth (or several disposable wipes) is best, since it will help to reduce the risk of leaving streaks across the screen from finger pressure. Do not make the cloth wet, only moist. A wet cloth can drip or run when cleaning the screen and the solution can weep behind the bezel and permanently damage your screen!
4.Wipe the cloth against the screen in a circular, or other consistent motion. Rapid circular movements generally eliminate streaks. Apply a gentle and even pressure to the cloth. Use only enough pressure to keep the cloth in contact with the screen. Take care not to press your fingers into the cloth or screen. Applying too much force when cleaning the screen can permanently damage the LCD matrix rendering your laptop screen unusable.

Replacing a Laptop Screen

If the image problem is due to a broken or malfunctioning laptop screen, replacing it is fairly easy. It should be noted that laptop screens are extremely expensive and can sometimes cost 50% or more of the total price of the computer, for instance more than $500 for a $1,000 computer. While a new screen can be purchased from the manufacturer, most people either decide to purchase a used laptop screen or buy a new laptop. Those who decide to replace their computer screen only need a screwdriver. Here are some easy steps to follow:
  • Step 1. Note the laptop screen type and purchase one that is guaranteed to fit. While some laptop models from the same manufacture may fit, ensure that it does before purchasing it. When ready to replace the screen, shut down the laptop, remove the battery, and unplug the laptop.
  • Step 2. Locate the screw covers on the plastic frame (usually rubber or plastic) to gain access to the screws that hold the screen to the bezel in place. In most cases, the screen has from 4 to 6 total screw covers. The user will probably need a small flat head or Phillips screw driver. However, some laptops might have their own screw heads that require special screw drivers or Allen wrenches to remove the screws. Screw covers are usually located at the bottom of the plastic frame. However, every computer model is different, so search for the screw covers to gain access to the screen.
  • Step 3. Once the screw covers are removed, remove all the screws while holding the screen in place. Once all the screws are removed, gently pull away the screen from the plastic bezel. The best way to accomplish this is to use one’s fingers to gently roll around the entire bezel, thereby loosening the screen. Once the screen is slightly separated, pull it away from the bezel with a light to moderate amount of force. If the screen does not budge, check whether any screws are still attached.
  • Step 4. When the bezel has been removed, the screen with a metal frame  surrounding it will be visible. Tilt the screen forward, exposing the LCD frame’s metal back. The screen should gently pop out of its back shell. The wires running from the screen to the laptop will be visible. There should be two main wires. The first is a ribbon, which is the video cable. The video cable is usually taped in place. Remove the tape and gently disconnect the ribbon from the LCD screen. The other wire is the inverter’s power cable. In order to only replace the LCD screen, continue to use the inverter, leaving it as is. However, in order to replace the inverter as well, disconnect the power cable and unscrew the inverter from its mount.
  • Step 5. Once the old screen is removed, plug in the new screen and set it in the shell. However, before screwing in the bezels, test the screen to make sure it is working properly. In order to test the screen, power up the laptop. If the screen is working properly when powered up, shut down the computer and continue to screw the screen to the bezel and cover the screws with the plastic or rubber caps.
Screen replacement is complete. The computer should work like new. Replacing the laptop screen without a technician is a great way to save money, not only on the cost of the laptop screen, but the cost of labor as well.

History of the Computer Keyboard


The invention of the modern computer keyboard began with the invention of the typewriter. Christopher Latham Sholes patented the typewriter that we commonly use today in 1868. The Remington Company mass marketed the first typewriters starting in 1877.

Inventions Leading to the Computer Keyboard

A few key technological developments created the transition of the typewriter into the computer keyboard. The teletype machine, introduced in the 1930s, combined the technology of the typewriter (used as an input and a printing device) with the teleqraph. Elsewhere, punched card systems were combined with typewriters to create what was called keypunches. Keypunches were the basis of early adding machines and IBM was selling over one million dollars worth of adding machines in 1931.
Early computer keyboards were first adapted from the punch card and teletype technologies. In 1946, the Eniac computer used a punched card reader as its input and output device. In 1948, the Binac computer used an electromechanically controlled typewriter to both input data directly onto magnetic tape (for feeding the computer data) and to print results. The emerging electric typewriter further improved the technological marriage between the typewriter and the computer.

Video Display Terminals

By 1964, MIT, Bell Laboratories and General Electric had collaborated to create a computer system calle dmultics; a time sharing, multi-user system. Multics encouraged the development of a new user interface, the video display terminal. The video display terminals (VDT) combined the technology of the cathode ray tube used in televisions and electric typewriters. Computer users could now see what text they were typing on their display screens making text easier to create, edit and delete, and computers easier to program and use.

Computer Keyboards Send Direct Electronic Impulses

Earlier computer keyboards had been based either on teletype machines or keypunches. There were many electromechanical steps in transmitting data between the keyboard and the computer that slowed things down. With VDT technology and electric keyboards, the keyboard's keys could now send electronic impulses directly to the computer and save time. By the late ‘70s and early ‘80s, all computers used electronic keyboards and VDTs. Nevertheless, the layout of the computer keyboard still owes its origin to the inventor of the first typewriter, Christopher Latham Sholes who also invented the QWERTY layout. However, the computer keyboard does have a few extra function keys.

How to use a computer keyboard


Whenever you use a computer, you’ll probably use a keyboard. The most common kind is referred to as a ‘QWERTY’ keyboard after the keys on the top row of letters. It was invented by C L Scholes in the 1860s when he was working out the best place to put the keys on a manual typewriter.
Follow these step-by-step instructions to help you get to know what your keyboard can do
 
So that you can carry out the simple exercises below, you’ll need a document open to type into. Read our guides What is WordPad? and How to open WordPad. Then create a WordPad document and go through the following steps.
 
Step 1: Have a good look at your keyboard. The most important keys are labelled on the diagram below:
 
Computer keyboard diagram with labels
 
Click here for an enlarged version of the above diagram, which you can print out for easy reference.
 
Some keyboards, especially those on laptops, will have a slightly different layout. For example, yours might not have a number pad or the delete key may be in a different place. But virtually all keyboards will have these important keys somewhere.
 
Step 2: The main keys are the letter keys. When you type just using these, you get lower-case print. However, if you hold down a ‘shift key’ (there are two to choose from) at the same time as you type, you’ll get UPPER-CASE letters.
 
Try typing your name, including capitals (UPPER-CASE) and spaces. The ‘space bar’ (which you press briefly to make a space) is the wide key at the bottom of the keyboard.
 
Step 3: If you make a mistake in your typing, there’s always a remedy.
 
To delete a letter, place your cursor (mouse pointer) just after the letter and click. Then press Backspace briefly. (Always press briefly – otherwise, you’ll get repeated deletions, spaces, letters or whatever.) Or place your cursor just before the letter, click and press Delete.
 
 
Step 4: Now try typing a sentence:
 
 
This is a good sentence to practise because it contains most of the letters of the alphabet.
 
Step 5: You can move the cursor along this sentence without deleting anything by using the arrow keys:
 
 
Try moving the cursor backwards and forwards through your sentence.
 
Step 6: Now try using the number pad, if you have one.
 
To use this to type numbers, you have to press the Num Lock key. There may be an indicator light at the top of the keyboard or on the ‘Num Lock’ key itself to show that it’s on.
 
 
Step 7: You can also type using the numbers on the main keyboard. You’ll find them on the row of keys above the top line of letters.
 
Above these numbers are various symbols, which include ‘£’, ‘&’, ‘!’. To use these, hold down the Shift key while you type. So if you press ’7′ on its own, you get ’7′, but if you press ’7′ while you hold down the ‘Shift’ key, you get ‘&’.
 
Try typing:
 
 
You’ll find similar extra symbols elsewhere on the keyboard:
 
 
They operate in exactly the same way as the ones above the numbers.
 
Step 8: If you want everything to appear in upper case, press the Caps Lock key and then type:
 
 
Again, an indicator light may come on to show that your capitals are ‘locked’. Don’t forget to press this key again when you’re finished to turn ‘Caps Lock’ off.
 
Step 9: The ‘Windows’ key comes in a number of different designs, such as the example to the right. 
 
It does exactly the same thing as the Windows button on the taskbar on your computer screen. You can choose to open the ‘Start’ menu by pressing this key or by clicking the button on the taskbar with your mouse.
 
Step 10: There are a number of ways that you can move round a web page. Try using the keys below to see where they take you:
 
 
Step 10: You’ll be told to use the ‘Control’ (Ctrl) and ‘Alternate’ (Alt) keys for some operations. When you do so, keep holding down one or the other key or both keys while you press any other keys.
 
 
For example, if you press Ctrl, Alt and Delete all at the same time, a menu will open. To make it disappear, press the ‘Escape’ (Esc) key in the top left-hand corner of the keyboard.
 
 
Step 11: Some of the things that you use the mouse for can be done with keyboard shortcuts. These require you to hold down one key while pressing another, and often involve using the ‘Ctrl’ and/or ‘Alt’ keys. Some people prefer using them to using the mouse. There are many shortcuts – check out the list provided by Microsoft Support.

Keyboard features


Keyboards for Chrome devices have a few extra features to help you browse the web effortlessly and effeciently. If you're using a Chromebook, you'll notice that your keyboard contains a dedicated search key and a new row of web shortcut keys. You can also use a standard USB Windows keyboard with your Chrome device and use the same keyboard shortcuts.

Shortcut keys

These keys appear at the top of Chromebook keyboards. If you're using a Windows keyboard with your Chrome device, the F keys at the top of the keyboard will work similarly to the keys below.
previous pageGo to the previous page in your browser history (F1)
next pageGo to the next page in your browser history (F2)
reload pageReload your current page (F3)
maximizeMaximize your window (F4)
overview modeSwitch to your next window (F5)
decrease brightnessDecrease screen brightness (F6)
increase brightnessIncrease screen brightness (F7)
muteMute (F8)
decrease volumeDecrease the volume (F9)
increase volumeIncrease the volume (F10)
search keySearch your apps and the web from your apps list. On a Chromebook, this key is located on the side, where you'd normally find the Caps Lock key. If you're using a regular keyboard, the Windows key in between Ctrl and Alt will work as the search key.Tip: To turn Caps lock on temporarily, press Alt + the search key.
Keys may vary slightly depending on your Chrome device model.